This is the best time of year for fruit. The berries are leaving that amazing scent in the grocery store and I’m powerless against it! Good thing they’re dirt cheap. I loaded up on a ton of melons and berries, you name it, it’s in my fridge.
I wanted to put together a quick little treat that anyone could easily recreate and enjoy! No need to turn that hot oven on and it’s even a perfect dessert for a 4th of July get together.

All you need is a few ingredients:
• Cup/bowl molds (I found these at Jo-Ann’s Craft Store)
• Chocolate chips, I chose white chocolate
• Your favorite fruits!
Prepare the molds by cleaning them out and drying completely.

Melt the chocolate chips, using either a double boiler or microwaving in 30 second intervals.

Plop a good glob of chocolate in the center of the molds and gently press the smaller mold on top. This will spread the chocolate throughout the entire cup/bowl mold. Unless you’re a master of measuring (I certainly am not), you will very likely have excess chocolate spread outside the mold. This isn’t a big deal as it will very easily break off once you remove the chocolate cups/bowls.

Place the mold upside down and put it into the fridge until you notice the plastic becoming frosty. I left mine for about 2 hours, just to give them plenty of time.
As soon as I got the fruit out to cut, I took the molds out of the fridge and into the freezer.
Cut the fruit however you desire.

Take the molds out of the freezer and gently remove the top mold layer. The chocolate cup/bowls will pop out easily and you can take this time to break/cut off any excess chocolate on top.

Put the fruit inside and there you have a pretty, delicious little dessert!

Category: Candy
Chocolatey Pretzel Peanut Butter Bars
The weather has been heating up and Summer is about to smack us all in the face. I’ve been living in the Bay Area now for about 6 months and we were so excited to find our house, that we forgot to ask if there was air conditioning. As you can probably guess… I don’t have air conditioning. We didn’t think it would be a big deal, as Northern California is usually cooler than Southern California, right? Wrong. It’s been in the 80’s the past few days and we’re pretty much melting in our own house. I don’t know about you guys, but I don’t think Summer is the time for heavy cakes and warm pies anyway… it’s the time for quick snacks! Anything that keeps my oven turned off is definitely a treat I enjoy in the Summer.
I decided to make a good ol’ peanut butter bar, but toss in some salty pretzels and semi-sweet chocolate to make it more awesome. It’s super easy to make, you don’t have to turn on the oven and it requires very few ingredients.

Ingredients:
• 16 oz. jar of creamy peanut butter
• 1 1/4 stick of butter (softened)
• 2 cups powdered sugar
• Pretzels
• 12 oz. bag of semi-sweet chocolate chips

Start by beating the butter and peanut butter until smooth n’ creamy.

Slowly add in the powdered sugar, I beat everything on high for about a minute, just to make sure it was well combined.

I didn’t measure the amount of pretzels, but it looked to be about a cup. I placed the pretzels in a ziplock and punched them until they were all in small pieces.
I poured the beat up pretzels and half the bag of chocolate chips into the mixture.

Stir it all up!
Line a 9X9 inch pan with foil and then lightly grease the foil.

Pour the peanut butter mixture into the pan and then press it evenly.

Melt the remaining chocolate chips and smooth over the top of the peanut butter mixture.
Smash up some more pretzels and sprinkle them on top.

Place the completed creation in the fridge.
Allow the ingredients to harden for about 2-3 hours. Pull up the foil from the pan and then cut them into as big or small of pieces as you like. I had my batch in the fridge for 2 hours and my poor bars were already softening as I cut them up… but I guess that’s what happens when it’s 88F in your house with no AC. haha.

Luckily, they held up long enough for me to cut them and to get some photos! They’re really tasty and store very nicely back in the fridge.
Enjoy! Get ready for Summer!
Strawberry “Carrots” for Easter
I was visiting my family in Southern California and was thinking of ideas for Easter on the Oven Mitt. You wouldn’t believe who had the best idea, my 13 year old nephew. He said I should dip strawberries into orange chocolate, so they look like carrots… Brilliant!! So, I take no credit in this adorable, yet super easy idea for Easter!
I was in luck, as my local grocery store had just restocked their organic strawberries. They all looked and smelled perfect! It’s definitely that time of year again for some beautiful, red ripe strawberries. For the sake of them looking like carrots, I would recommend grabbing some larger strawberries. 🙂

Ingredients:
• Fresh Strawberries
• Orange Candy Melts(I got mine from Michael’s)

Make sure your strawberries are clean and dry. I just rinsed mine off with cool water and patted dry with a paper towel.
Pour the candy melts into a microwave safe container. Set your heat to low, while doing 30 second intervals with the candy melts. Every time you go to reheat, stir the candy melts.
Once the chocolate is melted completely, gather the strawberry stems and gently dip into the chocolate.
Place the dipped strawberries onto a cookie sheet or plate that is lined with parchment paper.
As soon as you’re finished dipping all of the strawberries you want, place them in the fridge to harden.

I left my strawberries in for about an hour and they were perfect, but I continued to store the remaining strawberries in the fridge.
Enjoy!

Mom’s Fudge
This is a special post, where my mom is doing the bakin’. It’s the holidays, which means mom is whipping up her famous fudge! She’s always baking other goodies as well, baklava, pistachio bark and cookies. It changes every year, but the fudge is definitely the staple! I took down her recipe and got some action shots of her creating the chocolatey epicness that the family devours every year.

The Ingredients for 2 lbs of fudge:
3/4 cup butter
1 (5oz.) can of evaporated milk
3 cups sugar
1 (7oz.) jar of marshmallow creme
1 tsp. vanilla (she prefers to eyeball the amount, but guesses it’s about a tsp.) 🙂
1 (12oz.) bag of milk chocolate chips
2 cups of walnuts

Mom recommends getting every ingredient and tool that you’ll need before getting started, as time is important with making fudge.
In a 4 quart pan, melt the butter on medium-high heat.
Once melted, add the evaporated milk and sugar, stirring constantly.

Use a candy thermometer and continue stirring until it reaches 234F, then remove from heat. This usually takes about 5 minutes.
Scoop in the marshmallow creme.

Stir until smooth.
Working quickly, add the vanilla, chocolate chips and nuts.

Once all ingredients are combined and smooth, pour the fudge into a greased 9″x13″ dish.

Spread evenly and stick the dish in the fridge for at least one hour.

Once it’s nice and firm, you can cut the fudge out and eat it up!

Peanut Butter Blossom Cookies
The holiday must-have for my family is definitely the peanut butter blossoms. I enjoy making these so much because they’re simple to make and everybody enjoys them. Another great thing about the recipe is that you can easily axe the Hershey Kisses and make regular peanut butter cookies. I’m happy to add that I finally have a tripod! Even better… it was free! I was taking family photos at my parent’s house on Thanksgiving and my dad whipped out a tripod that I’ve never seen before. He mentioned that they hadn’t used it in over 5 years, so I gently suggested that it would be a great early Christmas gift to me… he agreed! The less fortunate news, I didn’t exactly take photos with well manicured nails, so please don’t mind my partially painted, bitten up finger nails. 😉

Ingredients for 4 dozen cookies:
1 cup butter
1 15oz. jar peanut butter
1 cup white sugar
1 cup brown sugar
2 eggs
1 tsp. vanilla extract
3 cups flour
1 tsp. baking powder
1 tsp. baking soda
1/2 tsp. salt
Hershey Kisses

Preheat the oven to 350F.
Cream together the butter, peanut butter and both sugars.

Beat in one egg at a time and add the vanilla.

In a separate bowl, combine the flour, baking powder, baking soda and salt.
Slowly beat the flour mixture into the butter/sugar.

You’ll know you’re getting somewhere when your mixer can no longer take it anymore.

This is where you may want to use your hands to combine all of the ingredients well.

Roll the dough into balls and roll them in sugar, this will keep them from spreading and create those beautiful cracks.
Place the sugared dough balls onto a greased or parchment paper lined cookie sheet and bake for 9-12 minutes or golden brown.

While you’re waiting for the cookies to bake, unwrap the number of Kisses you will need.

As soon as you take the cookies out of the oven, press a Kiss into the center of each cookie.

Allow the cookies to cool and enjoy!

Peppermint Bark
It’s beginning to look… a lot… like… Chriiiistmassss!
One of the easiest, yet tastiest things you can create for the holiday season is peppermint bark. It’s always been a favorite of mine and I don’t even like candy canes that much! As long as something is paired with chocolate, it’s got my vote. The beauty of peppermint bark is that you can tweak it to whatever works for you. A lot of people just use white chocolate and mix in the candy pieces, others don’t use candy canes at all, but use peppermint extract instead. I decided to have one layer of dark chocolate, one of white chocolate and then sprinkle some candy cane bits on top.

Ingredients:
1 12oz bag of white chocolate chips
1 12oz bag of dark chocolate chips
4 candy canes crushed
Melt the dark chocolate chips and spread evenly into a 9in. pan, lined with parchment paper. (If you’d like thinner bark, use a larger pan)

Place the dark chocolate in the fridge while you crush the candy canes and melt the white chocolate.

Take the dark chocolate out of the fridge and spread the white chocolate on top.
Sprinkle the peppermint pieces over the white chocolate.
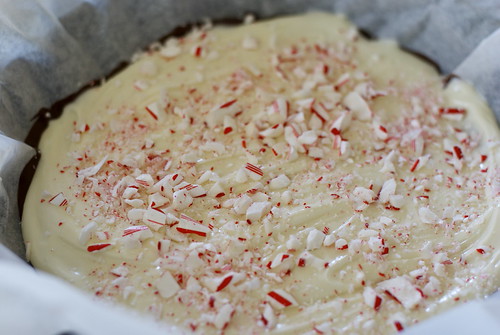
Place the bark in the fridge for about 45 minutes to an hour. Break the bark into pieces and enjoy!
I prefer to store my peppermint bark in the fridge, but it can also withstand room temperature storage.

Dark Chocolate Buckeyes
Ever since my little sister and I were born, my Grandma has lived in Florida. We’d fly out every Christmas to spend the holiday with her and the rest of the family. Once we were a bit older, we decided to alternate flying her out here and us out there, but during the summer time. South Florida in the summer is a mistake, but we love her very much, so it’s worth it. 🙂
Since she couldn’t see us for Christmas, she would send us tins and tins filled with her homemade cookies and candies. It was something we all looked forward to, even more than any Christmas present. All the fudge, chocolate walnut cookies, jubilee jumbos, lemon tarts and buckeyes we could eat. Buckeyes were my favorite, I’d always keep a secret stash in my room, so my dad wouldn’t eat them all. I decided to give the recipe a go and wasn’t disappointed.

Ingredients for 30 buckeyes:
• 1 16oz. jar of peanut butter (about 2 cups)
• 1 cup butter (softened)
• 1/2 tsp. vanilla extract
• 4 cups confectioners’ sugar
• 4 cups of dark chocolate chips
• Toothpicks

Start off by mixing the peanut butter, butter, vanilla extract and confectioners’ sugar in a large bowl. I just used my hands because it is quite a dry mixture.

Place the peanut butter mixture in the fridge for about 20-30 minutes, just so it can really firm up.
Roll the mixture into balls and place them onto a cookie sheet with wax paper.
Once all of the balls are rolled, place a tooth pick into the center of each ball and place them into the freezer for at least 30 minutes.

Melt the chocolate and immediately take the balls out of the freezer.

Using the toothpick as your dipping tool, dip each ball into the chocolate. Leave a bit of peanut butter showing at the top!
Place the dipped buckeyes back onto the wax paper.

Once they’re all complete, remove the toothpicks and place the buckeyes in the fridge until you’re ready to serve! Luckily, the chocolate hardens quickly, so you can enjoy them immediately.
I stored mine in an airtight container and kept them in the fridge.

Cookie Dough Pops
Ever notice that cookie dough usually tastes better than the cookie? Why is this!? Such a trick! Good thing we could easily make a cookie dough snack, as long as we take out the egg. I wasn’t sure how well these would turn out, so I used small measurements and some left over butterscotch chips. This recipe made 18 small pops. By all means, double or triple this recipe to create more of these small pops or to make larger pops. 🙂

Ingredients:
• 1/4 cup butter (softened)
• 1/4 cup sugar
• 1/4 cup brown sugar
• 1 tbs. milk
• 1/4 tsp. vanilla extract
• 3/4 cup flour
• Dash o’ salt
• 1/2 cup butterscotch chips
• 1/2 cup melted white chocolate
• 18 pretzel sticks
Start off by beating the butter and sugars together until fluffy.

Mix in the vanilla extract and milk.
Add the flour and salt until just combined.

Toss in your choice of chips and chill in the fridge for about 20-30 minutes, until the dough is stiff enough to roll into balls.
Roll the dough into balls on a sheet of wax paper and then place in the freezer for about 10-15 minutes.

Melt the white chocolate.
Once the dough balls are taken out of the freezer, stick a pretzel stick into the dough ball and dip into the melted white chocolate.

Place the completed dough balls in the fridge to harden the chocolate shell and enjoy!

Homemade Honeycomb
I first tried honeycomb when my mum bought some on a trip to Disneyland. As a child, I was willing to try anything that involved chocolate. Little did I know that the chocolate was only the beginning, it was the inside that was so magical! You’re hit with an immediate crunch and before you can even think, there is sugary, honey goodness melting ever so lovingly in your mouth.

As I got older, honeycomb became more and more difficult to find. I have discovered that some stores carry Violet Crumbles, but it just wasn’t quite the same. The easier and cheaper way to enjoy these amazing treats? Make ’em!

Ingredients:
1 cup sugar
3 tablespoons honey
3 tablespoons water
1 teaspoon vanilla extract
1 1/2 teaspoons baking soda
Heat the sugar, honey, water and vanilla extract in a sauce pan over medium-high heat.

Stir once to make sure all is combined, then let it boil.
Continue to heat until just before the mixture is 300F (this will be about 4-6 minutes).

Remove mixture from heat, add baking soda and stir well. Mixture will rise quickly.
Once everything appears to be blended well, pour honeycomb onto a greased cookie sheet or a cookie sheet lined with parchment paper.

Once you pour, just let it sit. Don’t spread the mixture and don’t pop the bubbles! The bubbles are what gives you that awesome texture. 🙂
Allow the honeycomb to cool, then break it up into as many pieces as you want!
Enjoy on it’s own or with some melted chocolate on top! (Don’t forget to store them in an airtight container)

I mustache you a question..
Have you noticed that mustaches and mustache-like props are cool now? I’m alright with it, nothing wrong with people drawing mustaches on their fingers and holding them to their upper lip or felt mustaches at parties. I’m down on the mustaches.
Some of you might be sick of them, which I can understand. Which is exactly why I’ll only bother you with this once!
I present to you, the choco-stache.

I bought a chocolate mold at Michael’s Craft Store (yay clearance!), some lolli sticks and some Wilton’s candy melts.

Melt the chocolate in a double burner or the microwave and pour it into the molds. Place the lolli sticks on the ridge and make sure it’s covered by the chocolate.

Stick them in the fridge for an hour or so. You’ll know they’re done when they look a little “frosty” through the mold. Just give the plastic mold a little twist and they’ll pop right out!
As my ever-so-enthusiastic model shows… they’re quite a treat. 😛